Mastering Coconut Butter for Smooth Homemade Almond Joy Cups
For many, the mere mention of an Almond Joy candy bar evokes a delightful craving: the sweet, chewy coconut, the satisfying crunch of an almond, all enveloped in a rich layer of chocolate. But what if you could recreate that iconic flavor profile in a healthier, homemade version, free from many common allergens and refined sugars? Enter the world of **homemade almond joy coconut butter cups**. These delectable, no-bake treats offer a fantastic alternative to traditional candy, packing all the nostalgic taste with wholesome ingredients. The secret weapon? Coconut butter. While incredibly versatile, coconut butter can be a bit particular to work with. This article will guide you through mastering this ingredient, ensuring your **almond joy coconut butter cups** are always smooth, creamy, and utterly irresistible.
Unlocking the Magic of Coconut Butter in Your Almond Joy Cups
At the heart of these healthier treats lies coconut butter, also affectionately known as "coconut manna" or "raw pressed coconut." Unlike coconut oil, which is just the fat extracted from coconut meat, coconut butter is made by grinding the entire raw, dried coconut meat into a creamy spread. Think of it as the coconut equivalent of nut butter. This makes it a nutritional powerhouse, rich in healthy fats, fiber, and essential nutrients.
The choice of coconut butter for these **almond joy coconut butter cups** is deliberate and transformative. It brings a dense, rich, and naturally sweet coconut flavor that forms the perfect base, mimicking the texture of the candy bar's interior. Crucially, it stands out as an excellent alternative to peanut butter or other nut butters, making these cups naturally allergen-free for those with nut sensitivities (always double-check other ingredients for cross-contamination). Beyond being allergen-friendly, coconut butter is also a star in keto and vegan diets, lending itself perfectly to a wide range of dietary preferences. Its use ensures that your homemade treats capture the authentic taste of an Almond Joy, but with a nourishing twist.
Essential Ingredients for Perfect Homemade Almond Joy Cups
Crafting the perfect **almond joy coconut butter cups** relies on a symphony of high-quality ingredients, each playing a vital role in achieving that signature flavor and texture.
- Coconut Butter: The Creamy Core
As our superstar ingredient, coconut butter forms the luscious, chewy base of your cups. Its inherent sweetness and rich texture are key to replicating the Almond Joy experience. While many brands are available, some can be smoother than others. Experimenting with different high-quality, organic brands can yield the best results for a consistently smooth finish.
- Natural Sweeteners: Balancing the Flavor
To complement the coconut butter's richness, natural sweeteners like maple syrup or honey add a touch of sweetness without resorting to refined sugars. For those following a ketogenic diet, liquid stevia is an excellent alternative that allows you to enjoy these **healthy almond joy cups** guilt-free. Remember that liquid sweeteners, especially cold ones, can impact the texture of coconut butter, a point we'll delve into shortly.
- Melted Coconut Oil: The Chocolate's Best Friend
This ingredient serves a dual purpose. When incorporated into the chocolate layer, melted coconut oil helps create a smooth, glossy, and spreadable coating that sets beautifully in the fridge. It also contributes healthy fats and a subtle, complementary coconut flavor, enhancing the overall profile of your **almond joy coconut butter cups**.
- Unsweetened Cocoa Powder: The Heart of the Chocolate
For that authentic dark chocolatey richness, unsweetened cocoa powder is indispensable. It's the ingredient that gives your cups their classic, deep chocolate taste, providing a wonderful contrast to the sweet coconut filling.
- Crunchy Almonds: The Signature Snap
No Almond Joy would be complete without the distinctive crunch of an almond. These nuts add a delightful textural contrast to the smooth coconut and chocolate layers, making each bite an experience. For an extra layer of flavor, consider lightly toasting your almonds before adding them.
- Shredded Coconut: Authentic Texture and Taste
A final sprinkle of shredded coconut not only reinforces the vibrant coconut flavor but also adds to the authentic texture reminiscent of the beloved candy bar. Opt for unsweetened shredded coconut to control the overall sweetness of your **homemade almond joy cups**.
Navigating the Nuances of Coconut Butter: Tips for Silky Smooth Results
Working with coconut butter can sometimes feel like a delicate dance. As referenced, it can be a bit "finicky," and quickly go from wonderfully smooth to seized or burnt. But with a few expert tips, you can master its unique properties and ensure your **almond joy coconut butter cups** achieve that perfect, creamy consistency every time.
The primary challenge with coconut butter is its tendency to seize up or become clumpy when exposed to sudden temperature changes, particularly when cold liquids are introduced. This is similar to how chocolate can seize when even a tiny amount of water is added.
Here’s how to navigate these nuances for consistently smooth results:
- Slow and Gentle Melting is Key: Unlike some fats that can withstand high heat, coconut butter prefers a slow, gentle melt.
- Microwave Method: If using a microwave, place the coconut butter in a microwave-safe bowl and heat in very short increments—15 seconds at a time is ideal. Stir thoroughly after each interval. Watch it like a hawk, as it can go from solid to burnt very quickly. The goal is just barely melted and smooth, not bubbling hot.
- Double Boiler Method: For ultimate control, a double boiler (a heatproof bowl set over a pot of simmering water) is excellent. The indirect heat prevents burning and allows for a gradual, even melt. Stir frequently until smooth.
Avoid rushing this step. Patience here pays off immensely in the final texture of your **coconut butter cups**.
- Warm Your Sweeteners: This is a game-changer. Cold maple syrup, honey, or even liquid stevia added directly to melted coconut butter will almost certainly cause it to solidify and become lumpy. To prevent this:
- Gently warm your maple syrup or honey. You can do this in a small saucepan over low heat for a minute or two, or in the microwave for a few seconds until it's lukewarm. It doesn't need to be hot, just not cold from the fridge.
- When mixing, gradually add the warmed sweetener to the melted coconut butter, stirring continuously until fully incorporated and smooth.
This simple step minimizes the temperature shock, allowing the ingredients to blend seamlessly.
- Don't Panic if it Seizes (A Little): Here's some good news from our testing! Even if your coconut butter mixture does seize up a bit when mixed with the sweetener, don't despair. As long as it's not completely burnt or unmanageable, you can still proceed. Once the mixture is chilled and set in your **almond joy coconut butter cups**, the textural difference often becomes undetectable. The important thing is to avoid extreme burning.
- Room Temperature Ingredients: Where possible, try to have all your ingredients (especially the liquid ones) at room temperature before you begin. This minimizes temperature differentials and helps everything combine more smoothly.
By understanding and respecting coconut butter's nature, you'll find it an incredibly rewarding ingredient to work with, consistently yielding smooth, delicious **almond joy coconut butter cups**.
Crafting Your Own Almond Joy Coconut Butter Cups: Step-by-Step
Once you’ve mastered the art of handling coconut butter, the assembly of your **almond joy coconut butter cups** is a straightforward and enjoyable process. These are no-bake wonders, making them perfect for a quick, healthy treat or a brilliant addition to your weekly meal-prep.
The general process involves two main components: the creamy coconut base and the rich chocolate coating.
- Preparation is Key: Start by lining a muffin tin with paper or silicone liners. Mini muffin tins are fantastic for bite-sized treats, while standard tins offer a more substantial candy bar experience.
- Creating the Coconut Base: Carefully melt your coconut butter following the "slow and gentle" tips outlined above. Once smooth, slowly incorporate your warmed natural sweetener (maple syrup, honey, or liquid stevia) until thoroughly combined. Scoop half-tablespoon (for mini cups) or larger amounts (for standard cups) of this mixture into each prepared liner, pressing gently to form a firm base.
- The Chocolatey Embrace: In a separate bowl, melt your coconut oil. Stir in the unsweetened cocoa powder until you have a smooth, dark chocolate sauce. If desired, you can add a touch of additional sweetener to the chocolate mixture, though the sweetness from the coconut base often suffices.
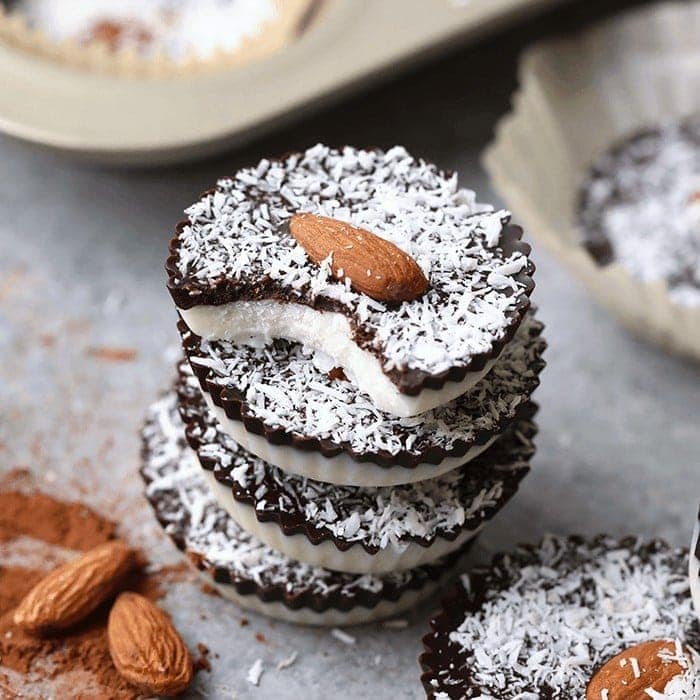
- Layering and Assembly: Now, for the magic! Pour a small amount of the chocolate mixture over each coconut base. While the chocolate is still wet, carefully press an almond or two into the center of each cup, and then sprinkle generously with shredded coconut. This creates that iconic Almond Joy look and taste.
- Chill to Perfection: Transfer your assembled **homemade almond joy cups** to the freezer for at least 30 minutes, or until fully set. The freezer not only speeds up the setting process but also gives these no-bake wonders a delightful firm texture, much like a chilled candy bar. Once set, you can store them in an airtight container in the fridge or freezer for a healthy, allergen-free meal-prep treat for the week!
For more variations and detailed recipe guidance, explore resources like
Healthy No-Bake Almond Joy Cups: Vegan & Gluten-Free Candy Alternative, which often offers creative twists on this beloved dessert. And if you're looking for more meal-prep inspiration, check out how these fit into a healthy lifestyle with
Almond Joy Coconut Butter Cups: Your Healthy No-Bake Meal-Prep Treat.
Conclusion
Embarking on the journey of making your own **almond joy coconut butter cups** is a rewarding experience that combines the joy of a classic treat with the benefits of wholesome ingredients. By understanding the nuances of coconut butter – its melting points, its interaction with temperature, and its incredible versatility – you can confidently create perfectly smooth, creamy, and utterly delicious homemade versions of this beloved candy. These no-bake delights are not only a fantastic allergen-free, vegan, and often keto-friendly option, but they also offer a satisfying crunch and a burst of coconutty flavor that truly rivals the original. So go ahead, arm yourself with these tips, and prepare to impress yourself and your loved ones with your newly mastered skill in crafting the ultimate **homemade almond joy coconut butter cups**.